Back to: Spring Boot Tutorial: Building RESTful APIs from Scratch
Introduction
We are going to learn how to build a robust RESTful API with Spring Boot. This tutorial covers everything from creating a project to testing with Postman.
If you’re looking to build a RESTful API, Spring Boot is an excellent framework to use. Spring Boot provides an easy-to-use platform for building RESTful APIs with a minimum of configuration. In this tutorial, we’ll show you how to build a RESTful API using Spring Boot, Gradle, and IntelliJ IDEA.
In this tutorial, we’ll use Spring Boot version 3.0.5. We’ll create a simple API that allows users to manage a list of books. Users will be able to create new books, retrieve existing books, update books, and delete books. We’ll use Gradle as our build tool, and IntelliJ IDEA as our development environment.
Before we begin, make sure you have Java 11 or higher installed on your machine.
What is a RESTful API?
RESTful API stands for Representational State Transfer Application Programming Interface. It is an architectural style for creating web services that use HTTP requests to access and manipulate data. RESTful APIs use HTTP methods such as GET, POST, PUT, and DELETE to interact with resources.
What is Spring Boot?
Spring Boot is an open-source framework that simplifies the development of Java-based applications. It provides an opinionated approach to building applications, which means that it provides default configurations and settings for commonly used components. Spring Boot eliminates the need for boilerplate code and makes it easy to develop, test, and deploy applications.
What is Gradle?
Gradle is an open-source build automation tool that is used to automate the building, testing, and deployment of software projects. It is similar to Maven, another popular build tool, but Gradle is more flexible and allows for more customization.
Installing IntelliJ IDEA and Spring Boot plugin
Before we get started with building the API, we need to install IntelliJ IDEA and the Spring Boot plugin. IntelliJ IDEA is an IDE that provides support for Java development.
- Download and install the latest version of IntelliJ IDEA from the official website.
- Launch IntelliJ IDEA and go to File > Settings.
- In the Settings dialog, select Plugins and click on the “Marketplace” tab.
- Search for “Spring Boot” and install the Spring Boot plugin.
- Restart IntelliJ IDEA when prompted.
*New IntelliJ IDEA may have installed this plugin
Creating a new Spring Boot Project
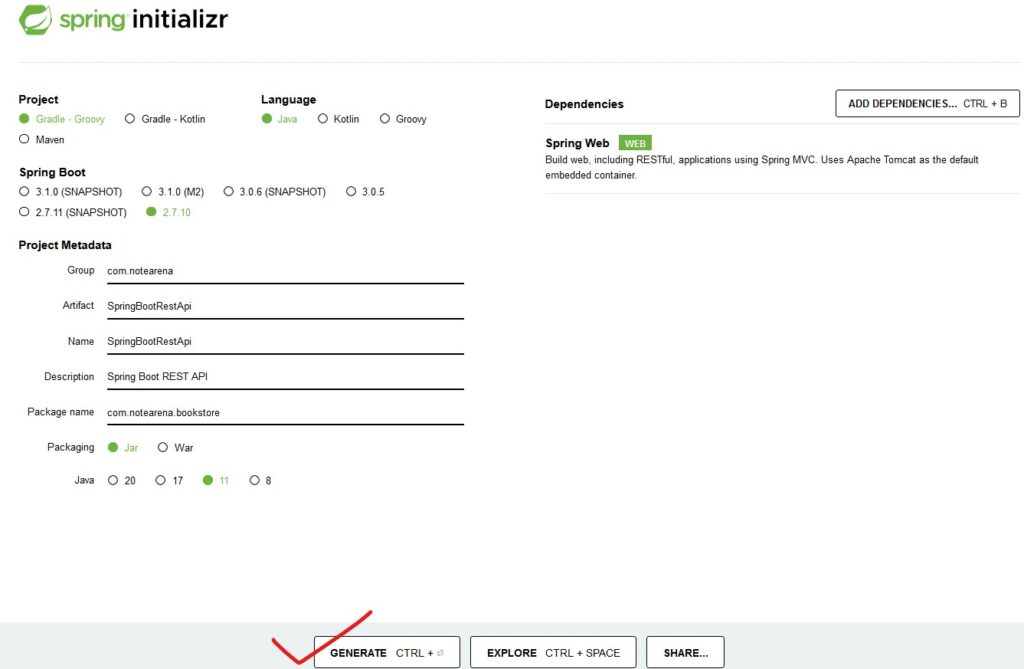
The first step to building a RESTful API with Spring Boot is to create a new Spring Boot project. We’ll use the Spring Initializr to create our project.
- Open your web browser and navigate to start.spring.io.
- Set the following options:
- Project: Gradle Project
- Language: Java
- Spring Boot: 2.7.10
- Group: com.notearena.bookstore
- Artifact: SpringBootRestApi
- Name: SpringBootRestApi
- Description: A simple API for managing books
- Packaging: Jar
- Java: 11
- Dependencies: Spring Web
- Click the Generate button to download a ZIP file containing the project.
Now that we have our project, we can import it into IntelliJ IDEA.
Importing the Project into IntelliJ IDEA
To import the project into IntelliJ IDEA, follow these steps:
- Open IntelliJ IDEA and click File > New > Project from Existing Sources.
- Navigate to the location where you downloaded the ZIP file, and select it.
- Click Open, and then select Import project from external model and Gradle.
- Click Next, and then click Finish.
IntelliJ IDEA will import the project and configure the build. This may take a few minutes.
Development of the Spring Boot REST API
Defining the Data Model
Now that we have our project set up, we can start defining our data model. In this tutorial, we’ll create a simple data model for books.
- Create a new package named com.notearena.bookstore.model.
- Create a new class named Book in the com.notearena.bookstore.model package.
- Add the following code to the Book class:
package com.notearena.bookstore.model;

public class Book {

    private Long id;

    private String title;

    private String author;

    public Book() {}

    public Book(String title, String author) {
        this.title = title;
        this.author = author;
    }

    public Long getId() {
        return id;
    }

    public void setId(Long id) {
        this.id = id;
    }

    public String getTitle() {
        return title;
    }

    public void setTitle(String title) {
        this.title = title;
    }

    public String getAuthor() {
        return author;
    }

    public void setAuthor(String author) {
        this.author = author;
    }
}
The Book class defines the data model for a book. It has three properties: id, title, and author. The id property is a unique identifier for the book, while the title and author properties contain the title and author of the book, respectively.
Defining the Repository
Now that we have our data model defined, we need to create a repository to manage our data. In this tutorial, we’ll use an in-memory list to store our data.
- Create a new package named com.notearena.bookstore.repository.
2. Create a new interface named BookRepository in the com.notearena.bookstore.repository package.
- Add the following code to the BookRepository interface:
package com.notearena.bookstore.repository;

import com.notearena.bookstore.model.Book;

import java.util.List;

public interface BookRepository {

    List<Book> findAll();

    Book findById(Long id);

    void save(Book book);

    void update(Long id, Book book);

    void delete(Long id);
}
The BookRepository interface defines the methods for managing our data. It has methods for finding all books, finding a book by id, saving a new book, updating an existing book, and deleting a book.
- Create a new class named InMemoryBookRepository in the com.notearena.bookstore.repository package.
- Add the following code to the InMemoryBookRepository class:
package com.notearena.bookstore.repository;

import com.notearena.bookstore.model.Book;

import java.util.ArrayList;
import java.util.List;
import java.util.concurrent.atomic.AtomicLong;

@Repository
public class InMemoryBookRepository implements BookRepository {

    private static final List<Book> books = new ArrayList<>();

    private static final AtomicLong counter = new AtomicLong();

    @Override
    public List<Book> findAll() {
        return new ArrayList<>(books);
    }

    @Override
    public Book findById(Long id) {
        return books.stream()
                .filter(book -> book.getId().equals(id))
                .findFirst()
                .orElse(null);
    }

    @Override
    public void save(Book book) {
        book.setId(counter.incrementAndGet());
        books.add(book);
    }

    @Override
    public void update(Long id, Book book) {
        Book existingBook = findById(id);
        if (existingBook != null) {
            existingBook.setTitle(book.getTitle());
            existingBook.setAuthor(book.getAuthor());
        }
    }

    @Override
    public void delete(Long id) {
        books.removeIf(book -> book.getId().equals(id));
    }
}
The InMemoryBookRepository class implements the BookRepository interface using an in-memory list to store our data. It has methods for finding all books, finding a book by id, saving a new book, updating an existing book, and deleting a book.
Defining the Controller
Now that we have our data model and repository defined, we need to create a controller to handle incoming requests. In this tutorial, we’ll create a simple controller for managing books.
- Create a new package named com.notearena.bookstore.controller.
- Create a new class named BookController in the com.notearena.bookstore.controller package.
- Add the following code to the BookController class:
package com.notearena.bookstore.controller;

import com.notearena.bookstore.model.Book;
import com.notearena.bookstore.repository.BookRepository;
import org.springframework.http.HttpStatus;
import org.springframework.http.ResponseEntity;
import org.springframework.web.bind.annotation.*;

import java.util.List;

@RestController
@RequestMapping("/books")
public class BookController {

    private final BookRepository bookRepository;

    @Autowired
    public BookController(BookRepository bookRepository) {
        this.bookRepository = bookRepository;
    }

    @GetMapping
    public ResponseEntity<List<Book>> getAllBooks() {
        List<Book> books = bookRepository.findAll();
        return ResponseEntity.ok(books);
    }

    @GetMapping("/{id}")
    public ResponseEntity<Book> getBookById(@PathVariable Long id) {
        Book book = bookRepository.findById(id);
        if (book != null) {
            return ResponseEntity.ok(book);
        } else {
            return ResponseEntity.notFound().build();
        }
    }

    @PostMapping
    public ResponseEntity<Void> createBook(@RequestBody Book book) {
        bookRepository.save(book);
        return ResponseEntity.status(HttpStatus.CREATED).build();
    }

    @PutMapping("/{id}")
    public ResponseEntity<Void> updateBook(@PathVariable Long id, @RequestBody Book book) {
    bookRepository.update(id, book);
    return ResponseEntity.noContent().build();
    }

@DeleteMapping("/{id}")
public ResponseEntity<Void> deleteBook(@PathVariable Long id) {
    bookRepository.delete(id);
    return ResponseEntity.noContent().build();
}

}
The BookController class defines methods for handling incoming requests to create, read, update, and delete books. The @RestController annotation tells Spring that this is a REST controller, and the @RequestMapping(“/books”) annotation specifies the base path for all requests to this controller.
The BookController constructor takes a BookRepository object as an argument. This is because the controller needs to access the repository to manage our data.
The getAllBooks() method returns a list of all books in our data store, the getBookById() method returns a single book with the specified id, and the createBook() method creates a new book and adds it to our data store.
The updateBook() method updates an existing book with the specified id, and the deleteBook() method deletes a book with the specified id.
Testing the API
Now that we have our data model, repository, and controller defined, let’s test our API using Postman.
1. Open Postman and create a new request.
2. Set the request method to GET and the request URL to http://localhost:8080/books.
Click the Send button to make the request. You should see a response with a list of all books in our data store.

3. Create a new request and set the request method to GET and the request URL to http://localhost:8080/books/{id}, where {id} is the id of a book in our data store.
Click the Send button to make the request. You should see a response with the book that matches the specified id.

4. Create a new request and set the request method to POST and the request URL to http://localhost:8080/books.
In the request body, enter JSON data for a new book. For example:
{ "title": "The Great Gatsby", "author": "F. Scott Fitzgerald" }Click the Send button to make the request. You should see a response with a status code of 201 Created.

5. Create a new request and set the request method to PUT and the request URL to http://localhost:8080/books/{id}, where {id} is the id of a book in our data store.
In the request body, enter JSON data for an existing book with updated information. For example:
{ "title": "To Kill a Mockingbird", "author": "Harper Lee" }Click the Send button to make the request. You should see a response with a status code of 204 No Content.
6. Create a new request and set the request method to DELETE and the request URL to http://localhost:8080/books/{id}, where {id} is the id of a book in our data store.
Click the Send button to make the request. You should see a response with a status code of 204 No Content.
Congratulations! You have now created a simple RESTful API using Spring Boot. This tutorial covered the basics of building a Spring Boot application, defining a data model and repository, and creating a REST controller to handle incoming requests.
Conclusion
In this tutorial, we learned how to build a simple RESTful API with Spring Boot. We started by creating a new Spring Boot project using the Spring Initializr, and then added the necessary dependencies and configuration to build our application. We defined a simple data model for books, along with a BookRepository to manage our data, and a BookController to handle incoming requests. We also covered the basics of testing our API using Postman, and showed how to create, read, update, and delete books in our data store.
While this tutorial covered only the basics of building a RESTful API with Spring Boot, it should provide a solid foundation for building more complex applications in the future. Spring Boot provides a wide range of features and tools for building robust and scalable web applications, and its ease of use and flexibility make it an ideal choice for many developers.
If you’re interested in learning more about Spring Boot and building web applications with Java, there are many great resources available online. The official Spring Boot documentation is a great place to start, as it provides comprehensive information on all aspects of building Spring Boot applications.
There are also many tutorials, videos, and courses available that cover Spring Boot and related technologies. Some popular online learning platforms for Java and Spring Boot include Udemy, Coursera, and Pluralsight, among others.
In addition to online resources, there are many user groups and communities dedicated to Spring Boot and related technologies. These can be a great source of information, advice, and support for developers at all levels.
Overall, building a RESTful API with Spring Boot is a great way to get started with web development using Java. With its powerful features and ease of use, Spring Boot provides a solid foundation for building robust and scalable web applications, and is an ideal choice for many developers.
Access code on springboot-projects GitHub repository.
Also, see the example code JavaExamples_NoteArena in our GitHub repository. See complete examples in our GitHub repositories.
Follow us on social media
Follow Author